Showing posts with label holo. Show all posts

Sunday, April 21, 2013

Orange Holographic Polish Comparison

**Polishes Purchased by Me**

I love orange polish, and I love holographic polish, so I go crazy over orange holographic polish.  It's not that easy to get a bright holographic orange polish.  The holographic part of the polish seems to dull the color of the polish or make it look a little "dusty."  The color itself in orange holographic polish often seems brownish rather than a more yellow-based orange or a more red-based orange.   I own a few orange holographic polishes, but until recently didn't have one that was a true orange holo that didn't look dusty or brownish or dull.  The creator of Dollish Polish recently offered to make custom polishes, and I asked her for my dream orange holo polish.  The result was The Holo Grail that she made especially for me:


My blog is now a year old, and my next post will probably be a giveaway post, and one of the prizes will be a bottle of The Holo Grail.  I bought three bottles--one for myself, one as a backup, and one to give away.

As far as orange holo comparisons go, The Crumpet did a very nice orange holo comparison post here.  There are also a few different posts at The Pointless Cafe with one-to-one or small group comparisons of orange holo polishes, for example, here and here.  If you know of any other good orange holo comparison posts, please let me know in the comments section below.

Here are some pictures with comparisons of the orange holo polishes that I own:

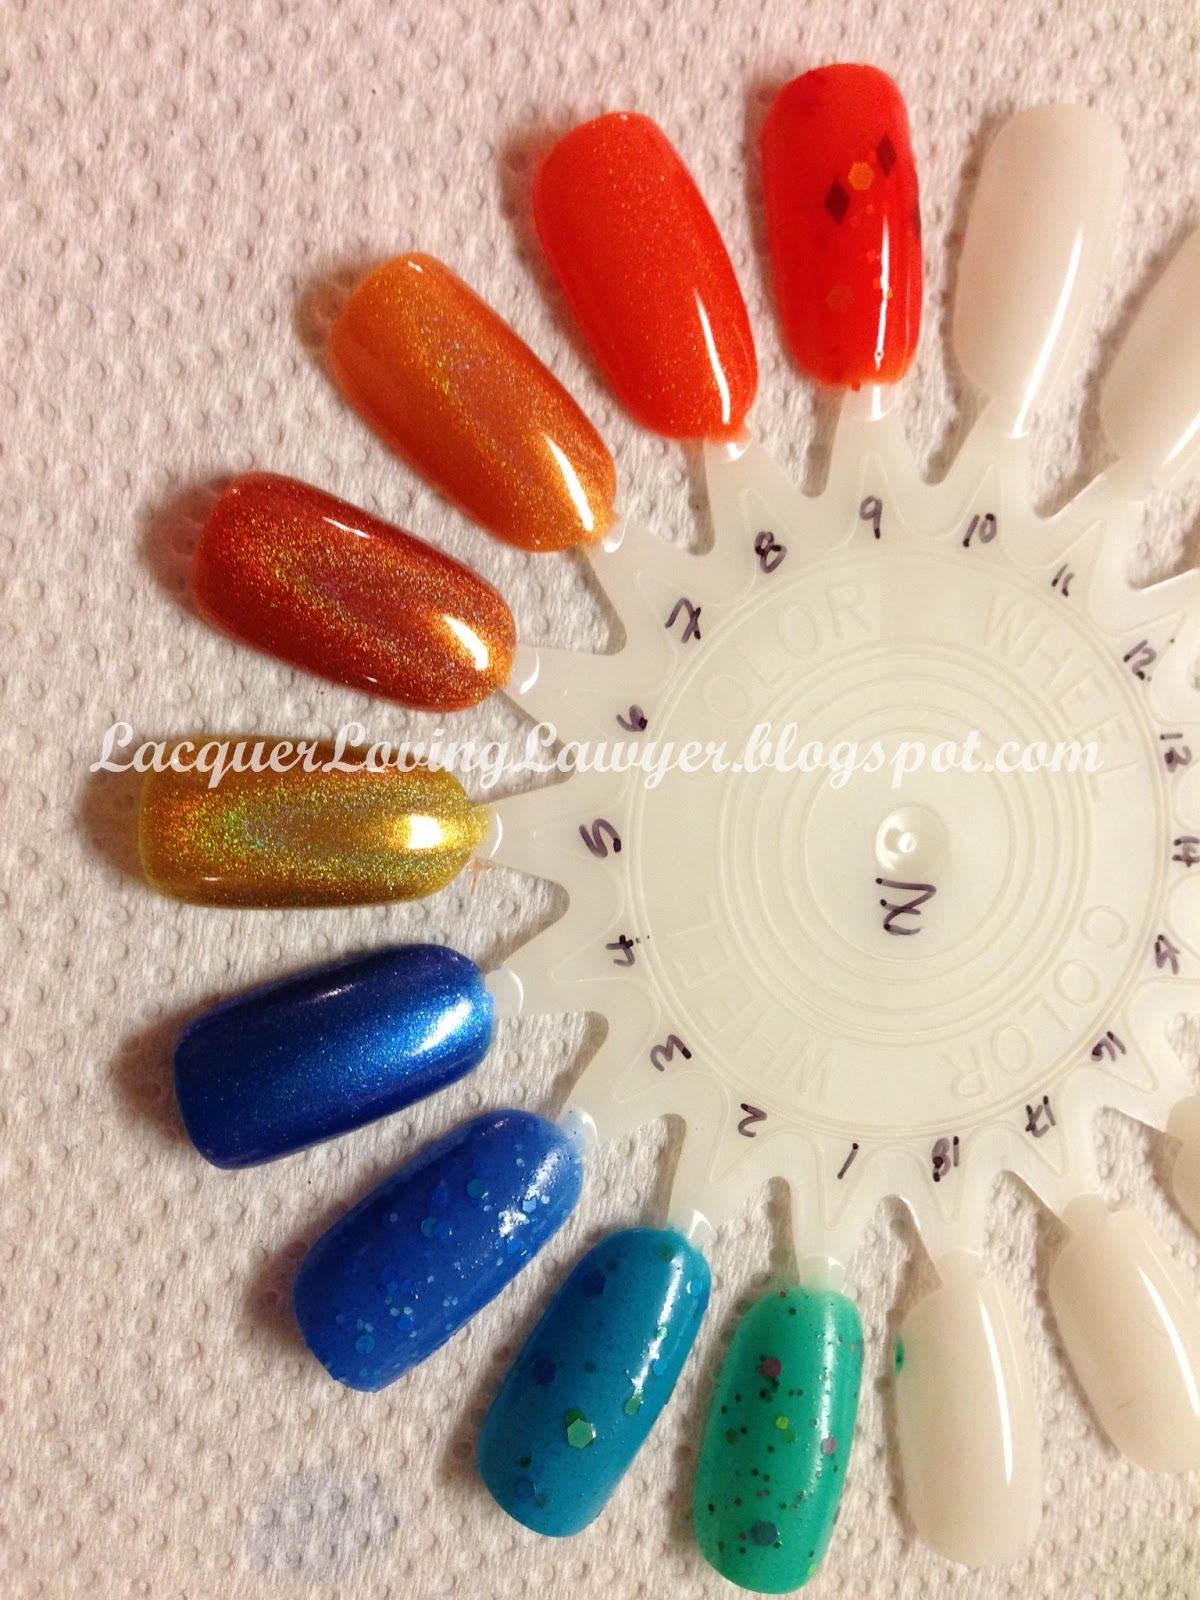
Left to Right:  Dollish Polish The Holo Grail, Enkelini Lainey Lou, Jade Uau!, Literary Lacquers More Like Fire Than Light, Hits Demeter, and Different Dimension Tubular


Left to Right:  same as above


Literary Lacquers' More Like Fire Than Light


One coat of each (above):
#8:  The Holo Grail
#7:  More Like Fire Than Light
#6:  Uau!
You can see that Jade's Uau! is very saturated even at one coat.


Two coats
On #9 is Pretty & Polished's Incinerate My Heart which I'm wearing on my toes right now.


The linear holo gets stronger at two coats in Literary Lacquer's More Like Fire Than Light, #7 above.
The Holo Grail, #8 above, has a weak holo effect indoors on a nail wheel; I haven't seen it outdoors.


This might be the picture that shows the holo in The Holo Grail (#8 above) the best.


You can see that the Literary Lacquer's holo (#7 above) has more yellow in it than Jade's (#6 above).


The Holo Grail (#8 on top wheel) has a very similar base color to China Glaze's Riveting (#3 on bottom wheel).


Hits Demeter (#6 on the top wheel) is more of a coral color.


The base color in The Holo Grail is similar to that in Hits Hula (#10 in the top wheel), one of my all-time favorite polishes.


A red holo, Hits Ares (#15 on bottom wheel), for comparison.


Different Dimension's Tubular on the bottom wheel at #16.
Tubular has a very weak holo, at least indoors, and it has more yellow in it.


On the bottom wheel were last year's Pantone set of Tangerine Tango polishes from Sephora.


On the bottom wheel at #1 is Enkelini's Lainey Lou, a really bright orange holo with more yellow in it than The Holo Grail.


Enkelini's Lainey Lou on the left.


Revlon's Haunted Heart on the top wheel at #6.


**Polishes Purchased by Me**

Thank you for reading my blog!

Thursday, January 10, 2013

Rainbow Honey XOXO over Sally Hansen Satin

My last post was a preview post of Rainbow Honey's Sweet Talk Collection for Valentine's Day.  If you click through, you can see pictures of the adorable packaging for XOXO and Sweet Talk, and you can see pictures of swatches on my nail wheel of each of the polishes by themselves and in combination with other polishes and with a matte top coat, and you can see a picture of the third polish in the collection, Be Mine, that I don't have right now.  My past few posts before that have been reviews of Rainbow Honey polishes, too, from the Yokai Collection for Halloween.

XOXO is a gorgeous glitter top coat.  It has red glitters in medium and small sizes.  Sometimes they came together to form a heart-like shape here and there on my nails.  There is also a gold shimmer or gold microflakes like tiny little pieces of gold leaf, and there is holo glitter in the polish.  The holo glitter is what I call the "pastel" holo glitter.  I've seen holo glitters that flash in pastel colors and holo glitters that flash in brighter primary colors.  The holo glitter in XOXO flashes appropriately in pastel shades.  The base of the polish is clear and not too thick but just right so that it goes on smooth and shiny, although even with one coat of Seche Vite and another of Revlon Quick Dry Top Coat, it's still not perfectly smooth, but it's very smooth without any jagged edges to the glitter.  It's not top-coat hungry, it's just that top coat doesn't sit perfectly smooth over the glitter, similar to but much less pronounced than the effect of top coat over flakies.  The red glitter flashes a gorgeous purple at times.  I used two very thin coats.  I tried to be subtle for work and used only one thin coat at first. One coat provided enough coverage, but then I wanted more glitter!  There was no shrinkage from either top coat; I love that about Rainbow Honey polishes.

I have seen a couple of other reviews of this gorgeous top coat on other blogs.  On the Galactic Lacquer blog, there are gorgeous pictures of XOXO over a strong pink polish.  I don't own a lot of pink polishes, so I didn't have many to choose from in my stash.  The result on Galactic Lacquer's post is what my ideal would have been if I had the "right" pink polish.  The Lacquerologist also shows XOXO over a perfect pink polish and also has pictures of Sweet Talk.  On the Nails in Nippon blog, there are pictures of both XOXO and Sweet Talk, and she has a picture of XOXO over black polish that is AMAZING!

In addition to being perfect for Valentine's Day, I think XOXO would also work nicely during the Christmas holidays, and I wonder what it would like over other colors like maybe a medium blue polish.

Here are some pictures of my XOXO mani:

Sunlight
Seldom seen right hand
You can see some of the gold micro flakies and how the red glitter flashes purple at times.
You can also see the holo glitters flashing in pastel shades.
Please excuse the cuticles; I had moisturized and was about to walk out of my house when I spotted a doggie peepee accident, and my OCD wouldn't let me not clean it up right away, and scrubbing tile and tile grout with cleaners is rough on my right hand, and I was running late and couldn't stop to moisturize again.


Left hand
Even in very low light conditions, this polish magically sparkles.
Didn't use this hand to scrub after the doggie accident,
but I did wash both hands and with that washed a lot of my prior moisturizing efforts away.


Seldom seen right hand
Indirect Sunlight
Sparkly even in low light
This picture comes closest to showing the true color of the pink "underwear" polish; the sunlight washed it out in other pictures.


Indoors
Seldom seen right hand
Camera was too dazzled by this polish indoors to take a better picture


I used Sally Hansen's Satin as "underwear" for XOXO.  Satin is a very pale pink with a peachy tone from the Smooth and Perfect Color and Care line.  I had wanted those pastel polishes ever since last Easter, and around Christmas they went on clearance at CVS, and I bought the pastel pink, orange, green, blue and purple polishes.  Now I'm all set for Easter this year!  I used two coats of Satin, and I still had visible nail line, but it looks nice.  I had heard other bloggers complain about the formula in the Smooth and Perfect Color and Care line pastel colors, saying that the formula was thick or difficult to work with or dragged or left bald patches.  I didn't have any of those problems.  The only issue I had was a couple of small bubbles, but I had just shaken the bottle before applying the polish, and you couldn't see the bubbles after I applied the XOXO top coat.  I thought the formula was good, not too thin or thick, and it didn't pool or flood my cuticles, and I barely had any need for cleanup.  There is a bit of a frosty shimmer to the finish, but it's not too brushstrokey.  The brush is wide and the end is curved like my cuticles, although that curved end is trimmed unevenly in places and looks like it has jagged edges, but the brush worked well with the formula, and the polish went exactly where I wanted it to go.  Below are some pictures I took of Satin while I was doing my nails, so it's pre-cleanup, and it's very poor quality indoor lighting:

Very poor indoor lighting -- left hand -- one coat of Satin
Pre-cleanup, manicure in process
The pale pink polish has a bit of pearly shimmer to it.


Very poor indoor lighting -- right hand -- one coat of Satin


Very poor indoor lighting -- left hand -- two coats of Satin
Pre-cleanup, manicure in progress


Very poor indoor lighting -- right hand -- two coats of Satin
You can see one of the small bubbles on my pointer finger, on the far right. 


The Sweet Talk Collection will be sold in a private sale at fab.com from January 16, 2013 through January 19, 2013. The Collection will be officially released on January 25, 2013 at 12:01 AM EST at rainbowhoney.com and participating Retail Partners around the world. Rainbow Honey generously shared a promo code for $5.00 off a purchase on their website.  PROMO CODE = SWEETTALK$5 (promo code expires 2/28/2013). Thank you Rainbow Honey for the promo code and for letting me review these lovely polishes!

I should have a review post of Sweet Talk by next weekend.

Note:  I received a free bottle of XOXO polish from Rainbow Honey and was asked for my honest and unpaid review of XOXO.  I am not affiliated in any other way with Rainbow Honey other than as a regular customer because I do buy, love and use their products.

Thank you for reading my blog!


Thursday, October 18, 2012

Rainbow Honey Kitsune from the Yokai Collection

I had a preview post here on the Rainbow Honey Yokai Collection with pictures of the package I received and of the three polishes swatched on nail wheels by themselves and in combination with other colors and matted.  I am really excited to be reviewing these polishes, and I'm honored that even with my blog being new, Rainbow Honey still sent me these polishes for review.

Rainbow Honey is an indie brand, relatively new but you would guess the opposite looking at their polishes and professional packaging.  These are my first Rainbow Honey polishes, although I have eyed many of them in the past.  After receiving the Yokai Collection, I went to the Rainbow Honey site and ordered minis of Hoof Wrassle, 20% Cooler and A Little Kindness.

The Yokai Collection polishes are limited edition for Autumn 2012 and were released only days ago on October 13, 2012.  The polishes are available on Rainbow Honey's website for $10 each.  These are good sized bottles at a half ounce each, and $10 is a very reasonable price for these indies that are so professionally produced and look like little mini works of art.

The first of the Yokai Collection that I wore was Kitsune.  I wore Kitsune all of last week as my manicure.

Kitsune is referred to as the Magical White Fox on Rainbow Honey's website.  The base is a gorgeous cream color, like the color of French vanilla ice cream or like eggnog.  With its golden microflakes and its small sparkling holo and red-orange glitter, this creation looks like a beautiful stone.  It is amazing to me that the polish has so much depth and that the microflakes and small glitters don't just sink into the polish but show right at the top of the manicure.  It's like someone cut a slab of perfect natural stone.

You can wear multiple coats of this polish, but I preferred the look of just one coat, so I wore "underwear" underneath it.

I have read other reviews where other bloggers describe the formula as thick and perhaps in need of a small amount of thinner.  I don't have really great manicure skills, though, and my hands shake a little, so I really *loved* this formula and didn't find that I wanted to add thinner to it.  I liked that it didn't pool or flood my cuticles, and I liked that where I put it, that's where it went and stayed.  I basically didn't need to do much cleanup, and I had no balding or dragging, even though I didn't wait between applying the underwear coat of polish and the coat of Kitsune.  The brush is great, round but a nice size and not too thin.  It was a very fast and easy mani, and I got so much payoff in terms of the beauty and complexity of the polish.  With a look that rich, you would think that I had put together layer after layer of this and that to make up the final look, but you get an amazing look in just one coat of Kitsune.

I found the formula top-coat hungry.  I like my manicures glassy smooth, and this mani didn't get that way until about Thursday.  I do my manicures on Sunday nights, so by Thursday I had the initial Seche Vite top coat plus another four coats (one per day) of Sally Hansen Quick Dry Top Coat.

The manicure wore extremely well for an entire week.

The polish reminds me of eggnog, and with the holo glitters and red-orange glitters and the very reflective gold mini flakes, it is very festive.  So, while it looks like shades of fall, I think it would also be a nice holiday polish.

You can count on Rainbow Honey polishes to be unique and unlike any other polishes out there.  I definitely don't have anything like Kitsune in my collection of polish.

In the pictures below, I have on a base coat, one coat of Sally Hansen Persistent Peony as "underwear," one coat of Kitsune, and one 1 coat of Seche Vite.
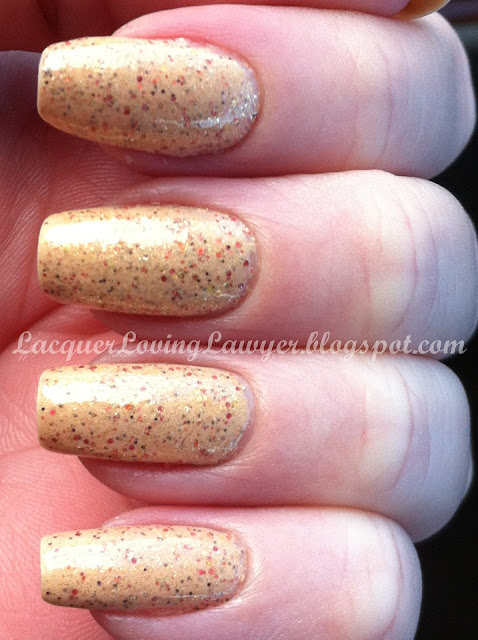


Sunlight


Indirect Sunlight


Sunlight
You can see the small and very reflective gold flakes in the polish.


See the holo glitters?


Indoors, not 100% color-accurate, but the color does look a little different in different lighting.


In this blurred picture you can see the golden shimmer effect.


Thank you for reading my blog!


Sunday, August 5, 2012

Hits Demeter

NOTE:  THE POLISH IS NOT AS BRIGHT OR ORANGE IN REAL LIFE AS IN THE PICTURES BELOW.

It is not easy to describe the actual color of the polish on my nails, especially as the color looked different in different lighting.  Without sunlight or bright light on it, the polish was a dull or dusty orange.  It was still very pretty, though.  Sometimes it looked like the color of band-aids, like it had a little brown or beige in it.  Sometimes it looked like butterscotch pudding.  In its more muted form, I think it might be a nice color around Easter, and of course it would make a very nice color for Indian summer or fall.  I would say it is a work-safe color because it doesn't stand out so much inside an office.

I used three coats, and there was still visible nail line in some lighting.  At three coats it was a little darker than the bottle color, so I stopped at three, not to mention that adding another coat would have added more drying time.  It did dry well, though.

The brush is a slightly wider, flatter and thicker brush than the traditional Revlon brush, for example.  I normally don't like wider brushes, but I do like the Hits brushes.

The formula is very good.  It wears very well, and I had no chips.  I did have some regular tip wear, and I had some shrinkage from quick-dry top coats.

Here are some pictures:

Direct sunlight.  It has a pretty good linear holo effect.

Bottle shot, after a week of wear.

Same as above, but in different lighting.

Sunlight.

Indoors, office lighting, against the outside of my rust-orange suit.

Indoors, office lighting, against the lining of my orange suit.

Indoors, flash.

Indirect sunlight

Indirect sunlight.


Thank you for reading my blog!

Tuesday, July 10, 2012

Cover Band Sticks and Stones Comparison to Candeo Colors Sprouse and Lush Lacquer Salt N Peppa

On Saturday I put a coat of Cover Band's Sticks 'n Stones as an accent on each ring finger nail on top of the Revlon Top Speed Chili that I had been wearing for a week.  On Sunday, before removing the polish, I added Candeo Colors' Sprouse to two different fingernails and Lush Lacquer's Salt N Peppa to another fingernail to compare them to Sticks and Stones.

Sticks 'n Stones is a copy (of sorts) of Lynnderella's Connect the Dots.  Sticks 'n Stones comes in a clear base, which I like.  It doesn't affect the underlying color, and the pattern comes across as very crisp.  The matte glitter is larger in Sticks 'n Stones than in the other two polishes.  Lush Lacquer's Salt N Peppa has a lot of colorful holo glitter large enough to show through and obscure the base color.  Sprouse has very tiny holo glitter that shimmers a little, and it has larger blue glitter.

I didn't have a problem with application, and the glitters dried relatively flat and were even smoother after a coat of Seche Vite.  I didn't have to fish for glitters.

My husband's favorite was the Salt N Peppa because it didn't "have all those 80's" bars and hexes.  My favorites were the other two, of course, *because* they have all those 80s-look bars and hexes.  In terms of getting the look of paint splatters that I like, I think the Sticks 'n Stones does it best with a little more white to it.  I do like the little blue hexes in Sprouse, though.

In each of the pictures below, I have base coat, three coats of Chili, a coat of Seche Vite, about four coats of Revlon Quick Dry Top Coat, a coat of each of the glitter top coats, and a coat of Seche Vite, and I had been wearing Chili for a week with no chips and just a little tip wear and shrinkage (from the original Seche Vite but not so much shrinkage from the Revlon Quick Dry Top Coat).

Outdoors in the sunlight (holding my husband's phone)

Top to bottom:  Sprouse, Salt N Peppa, Sticks and Stones, Sprouse.
I asked my husband if he could tell which two were the same, and he figured it out!

Top to bottom:  Sticks and Stones, Salt N Peppa, Sprouse.

Sprouse, Sticks 'N Stones, Salt N Peppa


Sprouse, Sticks 'N Stones, Salt N Peppa

In these last few pictures, you can see that the glitter lies flat.  There's a little piece of black bar glitter on one nail that was outside the polish area (near my cuticle, ring finger, last finger on the right in the photos), and I clipped it off easily later on.


Thank you for reading my blog!